

Hello again!
So, following on from happily fitting my McCalls 6696 Shirtdress , I really wanted to fit a basic trouser / pant; I felt I’d learnt a lot about fitting the upper half of my body but that the lower half was still shrouded in mystery. I say ‘shrouded in mystery’, what I mean is shrouded in massively oversized RTW boyfriend jeans – or lets be honest, PJ bottoms. I had no idea just how little idea I actually had about the size and shape of what lurked beneath!
I thought I was slim hipped, perhaps a bit short legged and with a backside not as pert as it once was (no doubt getting off it now and again would help in that department!) But that was about the sum total of my analysis. Just how hard could pant fitting be I blithely wondered? I’d found the perfect fabric; a gorgeous mid weight stretch cotton from a local shop and I was raring to go!
Well let’s just say I thankfully know more now than I did then. Now, straight off the bat, I have to say HUGE thanks to Anya (@anna.zoe.sewing) for helping me out so much. I’d emailed her a couple of very unflattering close up pics of my behind encased in my first pants toile (a #buttfie no less 😉 She sent back an incredibly detailed and helpful response. Gah, does that women know how to fit pants! If she ever designs her own range, get it!
A rather less underwear revealing Instagram shot of my first toile than the one I sent Anya…which also garnered so many helpful responses!
Anya’s advice was spot on! She very delicately pointed out that I perhaps had ‘athletic calves’ which was leading to excess fabric getting stuck above on the thigh and gently let me know that some of the issues with fabric pooling under my backside was due to it being a tad low and flat.
She wasn’t wrong! I slashed one of my pant legs from hem to the top of my calf to see just how much extra width was needed there. Immediately the whole trouser leg just settled much better – I needed over an inch more!
And yes, my backside is indeed a bit low and flat. Anya advised that I needed to take out the excess fabric there and then add it back in at the widest part of my calf (so that front and back leg pieces remained the same length).
I’ve also learnt that my inner thighs are disproportionally smaller than the rest of my leg. My waist is generally in a higher size bracket (*tuts*) than my hip and I already knew I had swayback issues. Mmm tricky trickster in terms of fitting then!

Toiles 2 and 3 quickly followed. I was using the basic Cigarette Pant pattern from the Gertie Sews Vintage Casual book simply because I had it to hand and it’s such a basic draft. Altogether, I graded between three sizes overall, reshaped the back crotch, slashed a ‘Y’ incision in the back leg to create the extra calf room, moved out the excess fabric from under my bum and did a swayback adjustment to make the waistline at both pant back and front parallel to the floor.
Of course I also did a bit of online research into ‘low seat’ and ‘flat butt’ adjustments. Can we please just take a moment to look at the variety of recommended modifications out there for these two issues…from the simple looking to the not so simple!
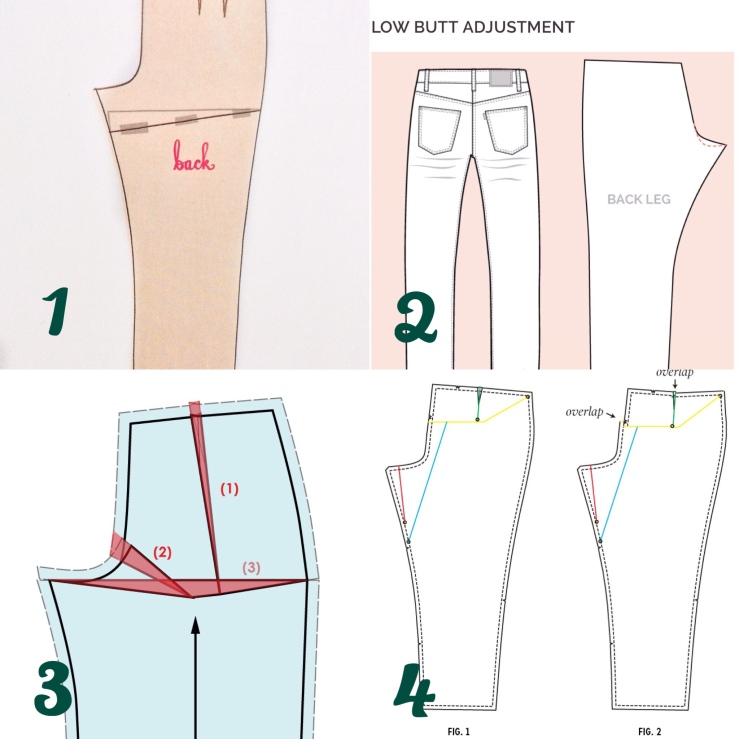
/1. From Gertie Sews Vintage Casual /2. From Closet Case Files /3. From Style Arc and /4. From Colette
I wasn’t totally happy with toile 3 but figured I was now wasting my time, procrastinating and faffing as much as anything. And my toile fabric was markedly different to the stretch cotton I was planning to use, which I hoped would be fairly forgiving, so I figured I needed to just bite the bullet and get on with it. Quite frankly toile No 4 would have had the Men in White being called for. So I attached the pockets and pocket facings and then literally basted in all other seams to check fit. I was fairly happy so proceeded to sew them together properly.
The pattern calls for an invisible centre back zip and a waist facing. I put in the zip but drafted a waistband instead of the facing. I basted it on, decided it was too high and didn’t allow enough room for pasta binges and so drafted another. I left a fairly wide tab at the back so the waistband can be adjusted a bit too. Again, pasta. (I married a Sicilian!)
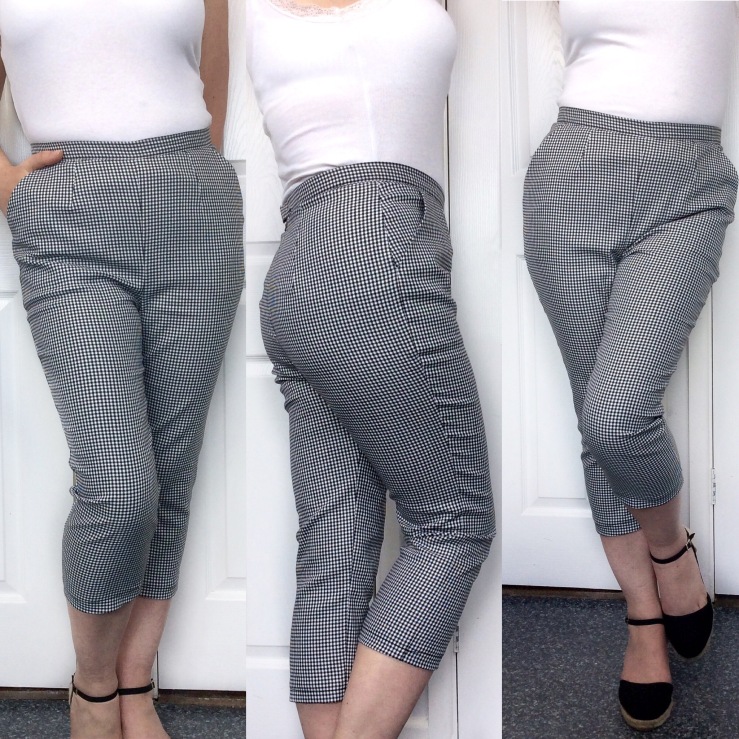
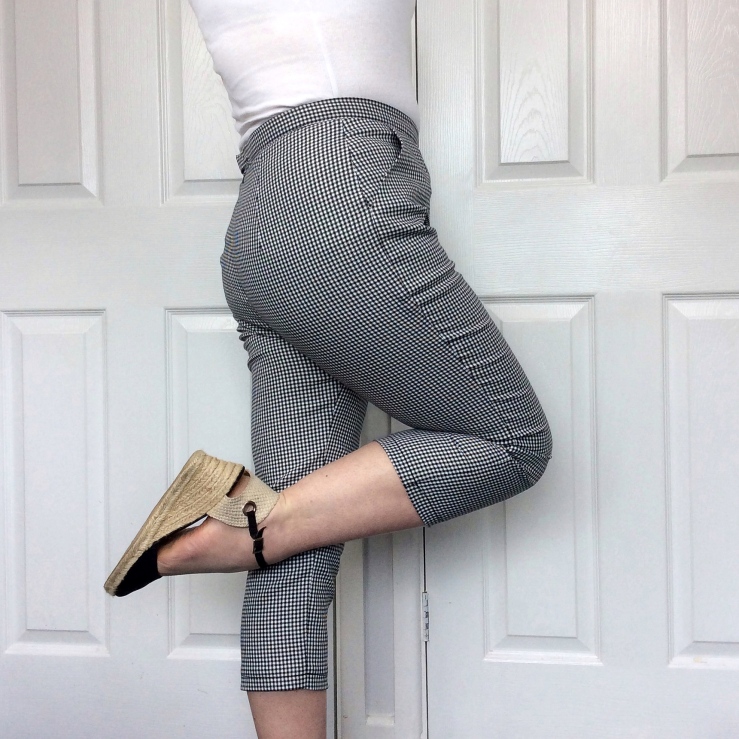
So there we have it. I’m happy enough with them. They’re super comfy and decidedly more flattering than my baggy jeans. Though they’re not at all perfect, I love ’em. They actually look better (less wrinkly) in real life than they do in these pics. I might tweak the pattern again (if I can be arsed, every pun intended) but I’m much more likely to try another. In fact I’ve got one altogether different summer trouser pattern coming to my cutting table (aka the dining table) very soon. And for the first time ever I feel I can justify making my own jeans…just got to decide on which pattern! A whole new world of sewing possibilities has just opened up now I’ve got a more considered view of myself and some idea of the techniques involved in altering pants to fit.
Oh and I’ve got plans for the perfect top to wear with these, not the tee pictured here but the Coppelia Wrap Cardy from Papercut Patterns. And that makes another two items checked off from my #2017MakeNine That cardi is now up on the Minerva Crafts Blogger Network HERE..

Until next time friends,

Liked this post? All links to Follow this blog can be found under the Comments section below. You can Follow me on Instagram here.

Oh you bloody genius! I’ve actually got one of those bendy ruler thingies but that never occurred to me! I think doing front and back separately probably gives a more accurate result doesn’t it. And your dead right…we’re liberated from the horror of the changing room mirror eh! Xxx
LikeLike
I think the beauty of sewing is that we can say these things without judgement and we can make clothes to fit. Whereas someone who just goes shopping and can’t find clothes that fit may then feel bad about themselves and their bodies.
I made the crotch template with a flexible ruler. Though it wasn’t quite long enough so I had to do the front and back curves separately, which may have caused iffiness but we’ll see. I saw it on a video and then my fitting book talks about it but I can’t seem to find any tutorials to link to.
LikeLike
Oh thank you Charlotte, that’s a lovely thing to say! Yeah, pants are tough…good luck with sewing yours when you get to it – definitely persistence helps (and trying not to het demoralised) but worth it in the end!!! Xx
LikeLike
Oooh that’s brilliant and thank you!!! Good luck!! Xx
LikeLike
Thanks Leigh! Oh this made me laugh…isn’t it funny how we start to see ourselves trying to sort out fit – how did you make the template of your crotch shape? Ooh err indeed! Yeah it’s ‘fun’ but I guess it’s a process we have to go through…😂😘😘
LikeLike
These look so good, Sarah! Even your first toile looks better than any RTW fit I’ve ever had. Tackling jeans fitting is on my list for this weekend, I’ve even made a template of my crotch shape (ooh err…) after I had so much bother with that the last time I tried trousers. I’ve provisionally diagnosed myself with a low bum, recessed crotch, full inner and front thighs and athletic calves so I that’ll be fun…
LikeLiked by 1 person
They are so amazing and look fantastic on! It’s inspiring to see yours and such a helpful informative post that I’m saving for when I finally make the jump. Thank you
LikeLiked by 1 person
[…] on the heels of my Classic Pedal Pushers post, I bring you the Coppelia Wrap Cardi from Papercut Patterns; I just think they pair so well! […]
LikeLike
Really enjoyed reading this Sarah! You’re extremely persistent and it paid off! Your pedal pushers look fantastic and they fit you like a glove! I’m a long way off from tackling trousers but from reading your post persistence seems to be the trick 😂 hope you get lots of wear out of them 😊
LikeLiked by 1 person
It’s going on my Wish List!!! X
LikeLiked by 1 person
They don’t really cover pant styles at all, much more focus on body shapes and fit challenges.
LikeLiked by 1 person
Thanks Jo!! My mother always told me I’ve got legs like a footballer! Anya really made me smile, here’s to athletic calves eh!! 👊🏻😉
LikeLike
Thank you so much. Oh, honestly, you should give it a go!! Don’t be afraid to get it wrong first time either – mine aren’t perfect but that’s how I learn best. Good luck!! Xx
LikeLike
Aw thank you so much! 😁
LikeLike
Hi, thanks Naomi – I did think about getting it as I love the main book. But I think I read somewhere that they don’t cover slim fitting pants? Is this true do you know? X
LikeLiked by 1 person
Looking at your pics on Facebook, I’d say you’ve made a really good start! Keep at it! X
LikeLike
Thanks Sonja, I’m really happy with the style and what I’ve learned!! Xx
LikeLike
Thanks buddy!!! You’ve been a great inspiration! Yeah I definitely feel I can transfer what I’ve learnt here; interesting what you say about not finding much difference in terms of which alteration method you use, so I’ll stick to using the simplest too!!! These are a decent enough start thanks to you
LikeLiked by 1 person
Oh that’s so cool, thanks Suzy! I had a bit of a giggle writing it – less so in actually sewing them, haha!! You could totally do these xxx
LikeLike
Ah Sue, I know exactly what you mean!!! My weight/size fluctuates dramatically too! If I eat something wheat based I balloon immediately, which doesn’t stop me! I’d say have a go again, stretch cotton is pretty forgiving! Xx
LikeLike
Thank you and no muumuus needed I’m sure; a good fit is always more flattering! That said, if I had a muumuu I’d live in it, I’m all for comfort! Find a good pant that shows off those slim legs! X
LikeLike
Ah thanks Kathleen! It is tricky isn’t it. What is it you didn’t like about your own pair? I’d say try again; you’ll crack it – perhaps doing it in stages is not a bad shout (I nearly lost the Will with these!) xxx
LikeLike
Nice work. Pants for Real People would be a great investment for you, the ultimate fit guide!
LikeLiked by 1 person
These are fabulous. The fit looks great 🙂 x
LikeLiked by 1 person
“Athletic calves” – I’m going to use that to describe my own from now on (despite my less-than-athletic character)! Well done on all your hard work – as I said on IG, they look so good!!
LikeLiked by 1 person
These pants look fabulous! Great job on the fitting! I have the same book and I always wanted to try the pedal pushers but I keep postponing it because of scary fitting issues 🙂 I should totally get over myself 🙂 great job!
https://sewinprogress.com/
LikeLiked by 1 person
Great pair of 50s style pants. All your toiles paid of. It looks great on you.
LikeLiked by 1 person
Oh my goodness!! Well, I feel so special and so happy that I could help! It was absolute pleasure. And I am so glad you found it helpful. It will be easier with more pants you make! And you will know exactly the adjustments you will need to make!
As for FSA… there are so many ways to do it! I usually resort to the easiest one. After trying all of them out, I didn’t find any significant difference between them!
Your pants look fabulous! I really like the way they turned out! Everything about them look great! You did fantastic job
Also, great and as usual hilarious read!
LikeLiked by 1 person
Well done Sarah! After your hard work, you’ve ended up with a chic pair of cropped skinnies that fit you beautifully!
Thanks for sharing your woes and also for sharing the tips that helped you achieve such a great fit. I started toiling Sewaholic’s trousers, but moved onto other sewing projects before I finished. It’s been so long, I think I might have to start over. One of my biggest fitting challenges is that it feels like my waist to thigh area changes sizes from day to day.
LikeLiked by 1 person
WoW! they are beautiful and you are so dedicated to the fit. I learnt loads reading this Sarah, thank you so much. Oh yes, and I had a bit of a chuckle too. xxxx
LikeLiked by 1 person
Thank you ,you’re details have me confidence. Curvy is challenging. I’m working with some belly weight and thin legs. May retreat to muumuus……
LikeLiked by 1 person
I’m pretty sure my fit issues are caused by chunky thighs and a big bum! Also, I reckon I need a slight knock kneed adjustment and they’re super baggy at the calf, so I definitely need to take them in there. I’m going to try to make the second toile a wearable one in stretch denim, as the crotch seemed to have a pretty good fit, so I’m hoping if I add a bit of width at the top and take them in lower down (leaving a big SA for adjustments!) I should have something that fits reasonably well. Fingers crossed!
LikeLiked by 1 person
Love your pants Sarah! Inspiring and your tutorial was so helpful. I took Sandra Betzina’s class on Craftsy for pant fitting and also found that really helpful but once I’d finally fitted and finished my final pair I didn’t like them after all so I think I must at some point return to the process. Fitting pants is tricky. I’ve made several pairs of leggings successfully but there’s lots of forgiveness in those – a woven pair of pants with the right amount of ease (not bagginess) is no easy task.
LikeLiked by 1 person
Haha you’re more than welcome Barb; I’m not great at censoring myself! It’s good to giggle eh! 😘😘 And I really appreciate your lovely comment, so thank you!
LikeLiked by 1 person
First let me say your post was incredibly helpful, specific, and frank regarding “bum” fit. Secondly, I laughed said bum off reading it 😅 Thanks, I appreciate both!!
LikeLiked by 2 people
What issues do you have Anna-Jo? Maybe I could still help? Or we can learn more together! Xx
LikeLiked by 1 person
I’ve recently done my first toile of this pattern so read this with interest! Unfortunately my fit issues are very different to yours so not sure I can take much away, other than it should be well worth persevering. They look fabulous on you!
LikeLiked by 1 person