

Today’s mega topic for discussion is all about creating dartless Full Bust Adjustments for knit sewing patterns. There are loads of different methods out there; do you really need one and, if so, which works best? Are you sitting comfortably? Then we’ll begin!

You may recall that recently I sewed up my first Jenna Cardigan. Whilst this is an easy pattern to sew it did throw up an interesting challenge, personally. The Jenna is designed for a B cup and has slight negative design ease in the bust. Being a D cup there was no getting away from the fact that I was going to need to create some extra room in there for my boobage!
With my first Jenna I did a ‘cheater FBA’; relying on the stretch of my fabric I merely attempted to create extra width by grading out a size at the side seam starting at the underarm and tapering back in at the waist. It was ‘kind of’ sufficient but I mostly found that I had excess fabric at the underarm and still needed extra snaps to get the button band to lay flush. Overall it left me feeling a bit ‘meh’.
So, I got out pen and notepad and set to work, researching the various methods for a creating a dartless FBA suitable for knits. This post covers what I found to be most, ahem, pert-inent 😉 You have to discover the one that makes the most sense to you …
Here I list six methods, with Option 6 being my personal favourite – I’ll take you through that one step-by-step!
But, before I go any further into the various methods of knit FBA’s I discovered, I think when approaching your next knit project it’s worth asking yourself these three key questions:
Do you really need a FBA with your particular project?
Basically the stretch quality of your knit fabric may be sufficient, if you’re working with a particularly s-t-r-e-t-c-h-y jersey for example. Some negative ease can also be fine sometimes, say in a fitted Tee. However, in a front fastening cardigan it’s less likely to be enough. Check the finished measurements on your pattern; how much ease is built in? Is there enough to ‘cover your assets’? You’re never likely to need a FBA with the Linden Sweatshirt for example!
Importantly, if you are going to progress to doing a FBA it is crucial to assess the percentage stretch of your jersey as this will also influence how much, or how little, a FBA you need to do. With a woven FBA you would simply add half your required amount to your half bodice piece; however with a stretchy knit you may, for example, only need to add a quarter of that.
Are you Shorter or Taller than the Pattern is Drafted For?
If you are, it may be that your boobs won’t be accommodated properly irrespective of whether they’re technically in the right size garment or not, simply because the fullness of your chest won’t be in the same place the pattern assumes it will be! For example, if you’re shorter you may find you have lines, or a folded flap of fabric, radiating from the armscye of your finished garment. If so, you may need to do a Petite Bodice Adjustment, i.e shortening or folding your pattern piece horizontally across the upper chest and through the armscye to take out the excess length there. You may still ALSO then need to do a FBA!
Are you Planning to Pattern Match, say, Stripes?
Choose your FBA method wisely, not all are geared with this in mind (see below).
Option One – Cheat!
You know what they say, if in doubt…cheat. Just add extra width/grade out at the side seam. It works … to a degree.
Option Two – Pivot & Slide!
This method is advocated by Patterns for Pirates and Maria Denmark. Relatively quick and easy, this method essentially works by pivoting your pattern piece at the shoulder to re-grade it at the chest. In essence then, it just adds width in the bust area which is ok if you don’t need to do too big an adjustment perhaps. I personally wanted extra length at the front as well.
Option Three – Vertical Only FBA
See Communing with Fabric which proposes doing the exact opposite of the Pivot & Slide method by simply adding length at the front by slashing and spreading at the chest.
Option Four – Two Line FBA
Alexandra Morgan’s two line FBA (You Tube) illustrates two methods including one which simply eases the bust dart into the side seam, in pretty much the same way you’d ease a sleeve head into an armscye. This would only work sufficiently if your resultant dart legs were an inch or less wide. Side note of caution, bear in mind if you’re planning to sew with stripe fabric, again this is going to royally mess up your pattern matching!
Option Five – Palmer-Pletsch’s Y Dart Method
For an FBA larger than 1.5” it might be worth looking into Palmer-Pletsch’s method illustrated here by the Curvy Sewing Collective as a starting point. You will still need to rotate that dart out afterwards though.
Option 6 – My Preferred Method
But the one method, BY FAR, that made by brain sit up and take notice was the dartless method prescribed by Jennifer Lauren Handmade. Now, I admit, the first time I attempted to follow her diagrams I got a bit stuck at one key point – though this was probably due to suffering the effects of severe sleep deprivation! When I went back to it I had a face-palm moment when *cue music* it finally clicked, the sun came over the horizon and all the little birdies started tweeting. You get the picture!
So, I thought I’d use my Jenna bodice piece to illustrate how I interpreted Lauren’s diagrams. Spoiler alert, the end result is TOTALLY BLOOMIN’ FANTASTIC AND ABSOLUTELY WORTH THE EFFORT. You get me?!
Step by Step ‘How To’
First off, I lay my pattern piece atop the ruler guides of my cutting board as it makes it easier to accurately slash and spread your pattern to the exact increments you’re after. You then start off by doing a standard FBA in exactly the same way you would for a woven garment…before rotating that dart out.
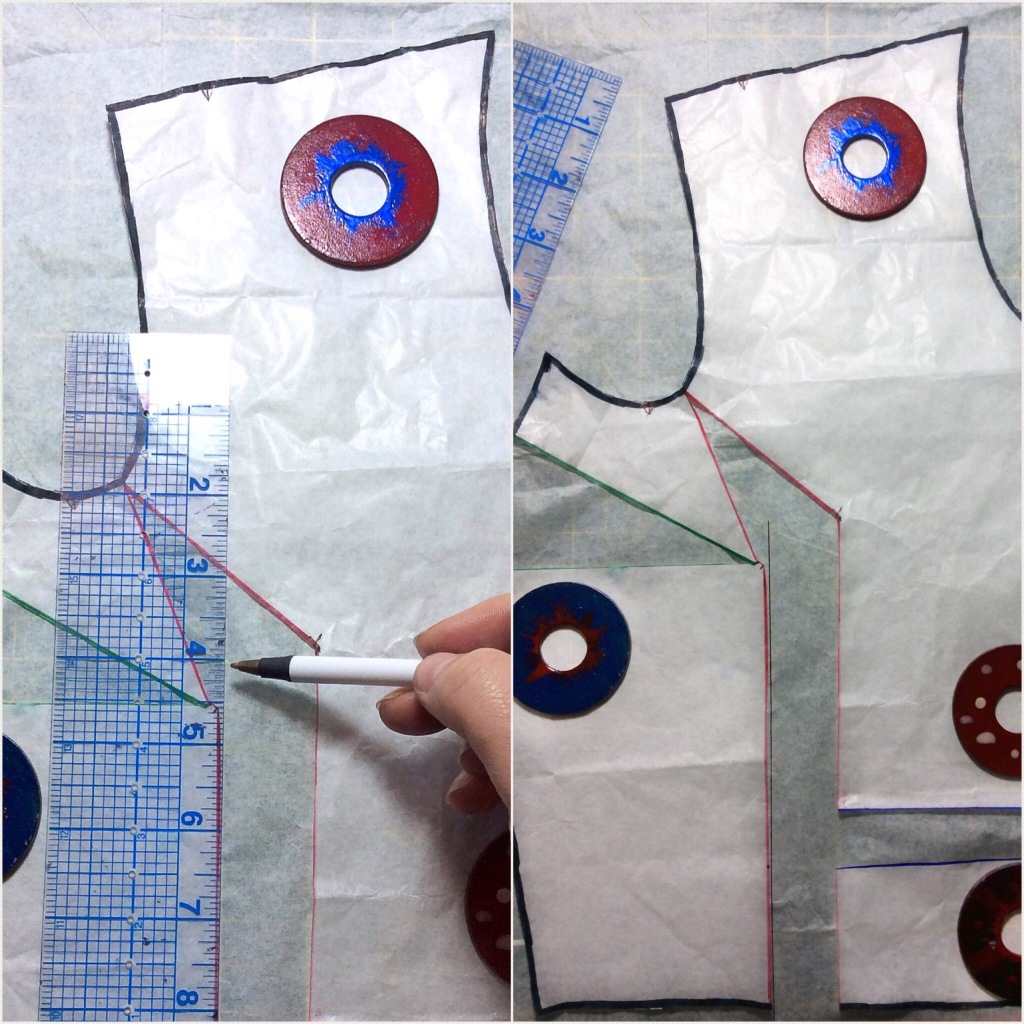
Unfortunately, determining and marking your apex is slightly trickier with a knit bodice pattern piece – if you haven’t made the garment before pop on a similar fitted jersey top and mark your apex with some masking tape. Whip it off again and then place your pattern piece over your top and transfer the marking.
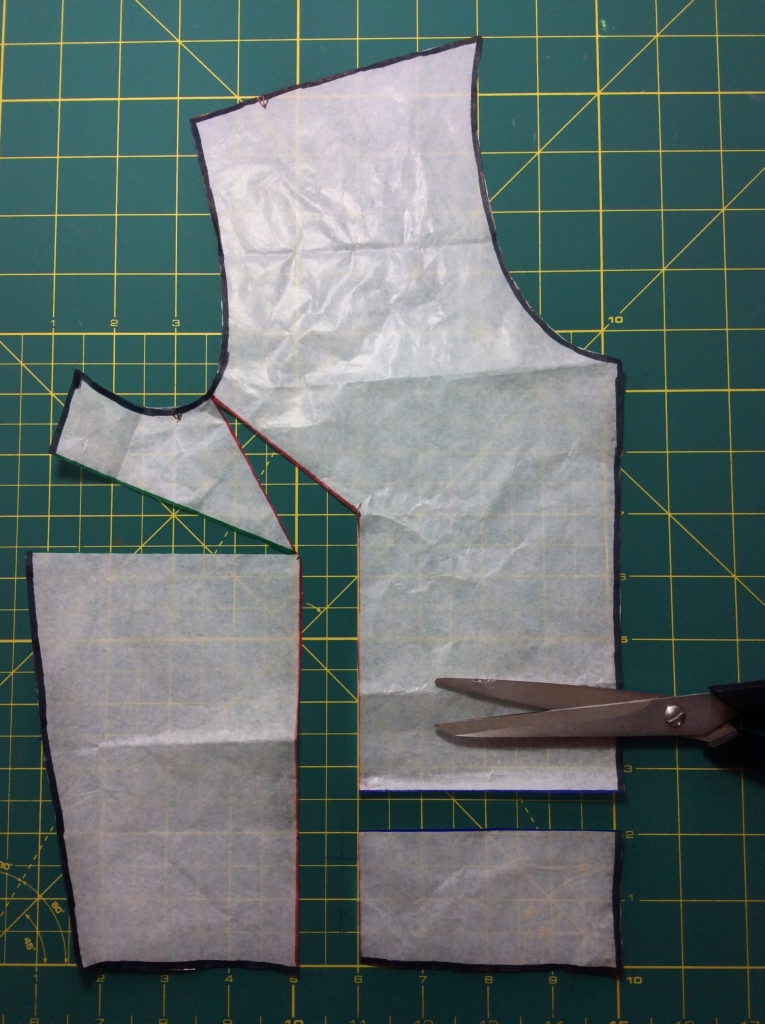
Once you’ve marked your apex, draw in your usual cut lines – like this:

Cut through the red line from the hem through to the armscye; stop cutting a couple of millimetres before the armscye to create a moveable ‘hinge’. Cut the green line from the side seam, again stopping a couple of millimeters short of the apex point to create your second hinge.
Then spread your pattern piece at the apex point by your required amount. (I initially spread mine at 0.5”). This will automatically create the side bust dart you’ll remove later – you will also notice that your side length is now longer than your centre front length:

Cut straight across along the blue line and lower that piece so it’s aligned:
(I decided to go the whole hog and increase by an inch!)
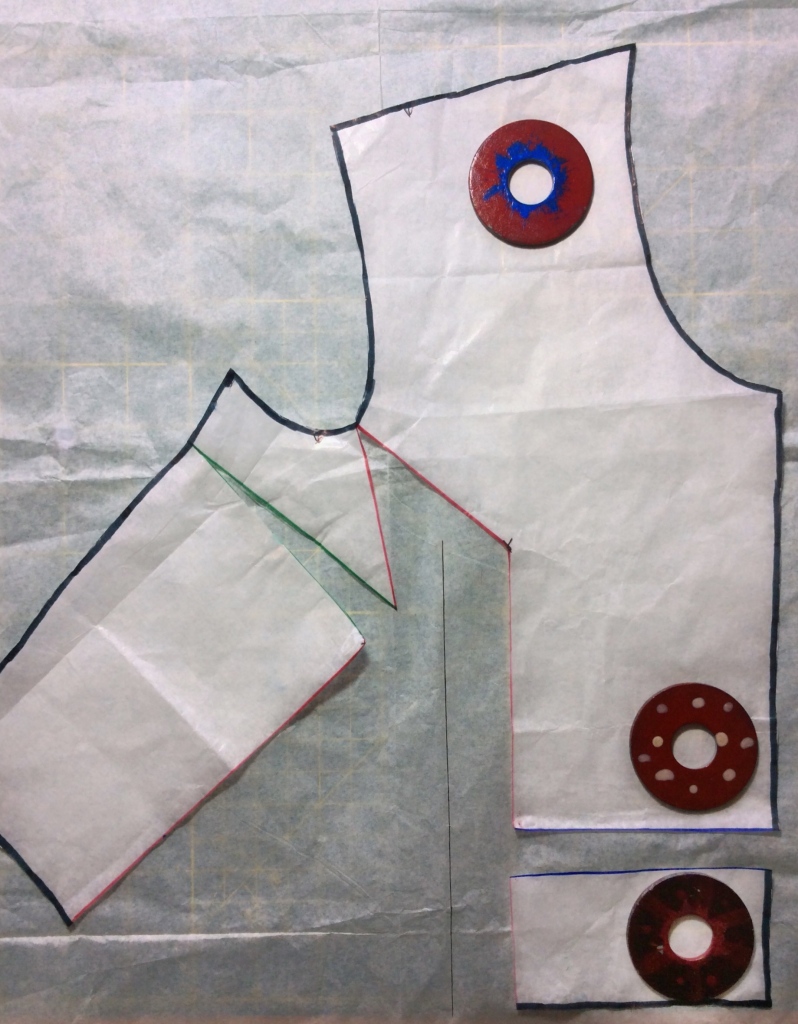
Pop some more tracing paper under your cut pattern and stabilise it with pattern weights, tins of beans or whatever else you’ve got handy.
Align your ruler and draw in the line on your bottom paper, as a reference point for later, like so:
Now tape your side bust dart back together (being careful NOT to stick it to the paper underneath!) – see how far your side piece now moves away from the reference line you drew in the previous step?

Before you taped your dart together, remember how it’s ‘hinge’ was at the apex point? Well, now we’ve taped the dart together we are again going to cut through it BUT this time cutting across in the opposite direction – from the apex to the side seam – again stopping a couple of millimetres shy of the side seam to create that all important hinge. What you’ve essentially done then in these last two steps is merely move the position of the hinge of the dart from one side to the other:
Now this next step is where I initially got flummoxed when I first looked at this method *need sleep* but, simply, move the bottom left section back up to realign with the reference line you drew earlier. Notice how in order to do this, the piece above is overlapped? Bye bye dart!

The last thing you will need to do is draw in and ‘true’ your new hemline; I opted to curve mine (see above).
You have created extra width, extra length and rotated out your dart! You need to now seriously consider whether you want to redraw / reshape your waist line at the side seam (see below).
At this point I drew around the whole thing to create my new bodice piece. Look how my finished piece compares with its original:


You May Need to Redraw Your Side Seam!
If your bodice piece is of regular length you may need to redraw your waist curve, i.e tapering back in at the side seam so that your waist measurement remains true (mine is cropped, I just eased the excess into the waistband). You will need to redraw the waist curve starting from well under the bust point, as shown below :

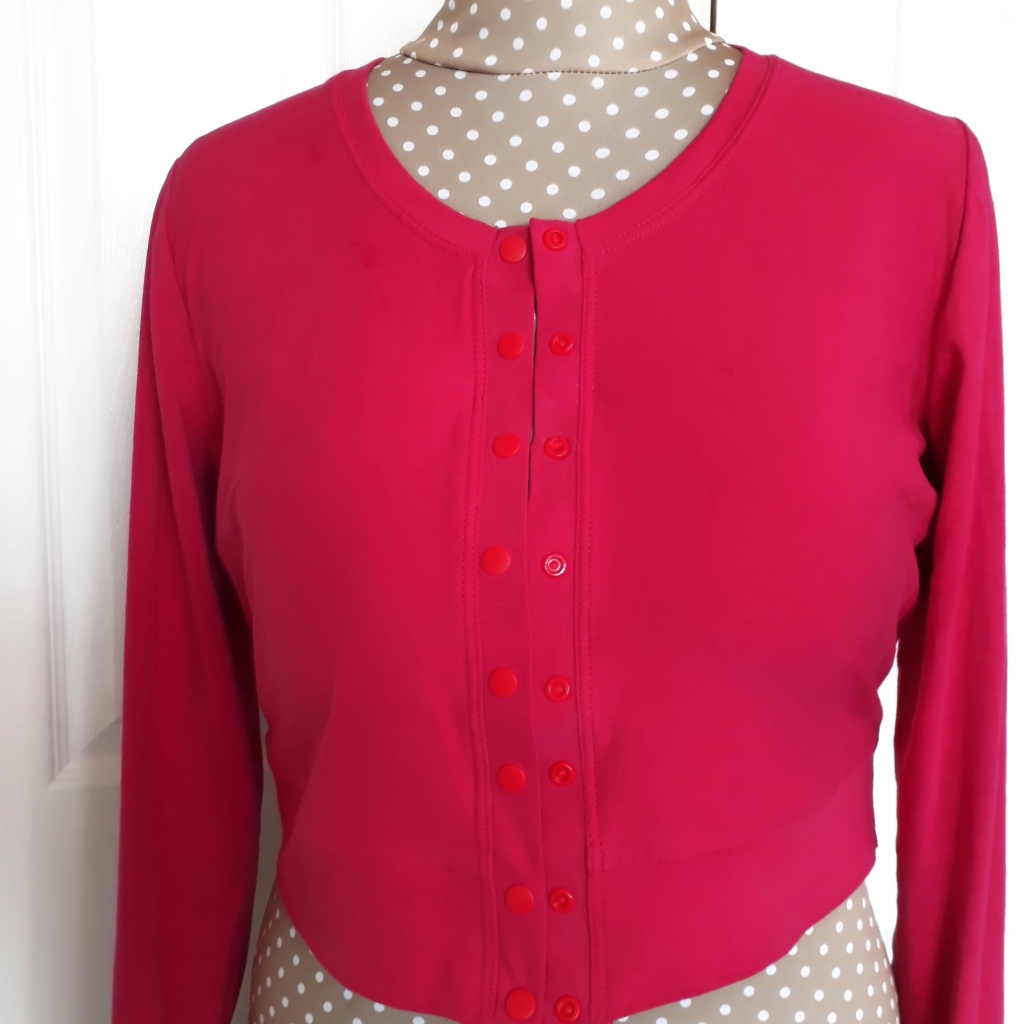
This is what my finished cardigan looked like having adopted this method; see how the button bands meet equally along its entire length, with zilch gaping or straining at the bust? Result!
Until next time, I hope this was useful – let me know and please leave any other tips or suggestions you may have!

For more regular sewing chat, you can find me on Instagram at @sewsarahsmith

Like It? Pin It!
Latest from the Blog

#SEWTOGETHERFORSUMMER is Back! 2021 Community Sewing Challenge!
And it’s back! You may recall last year, we dropped our yearly #sewtogetherforsummer challenge theme as the reality of the global pandemic…
Keep reading
Sewing the Lined Lace Tulle version of the Black Beauty Bra! View B
Hi! You may have seen that I’ve recently sewn two versions of View A of the Black Beauty Bra (by Emerald Erin)…
Keep reading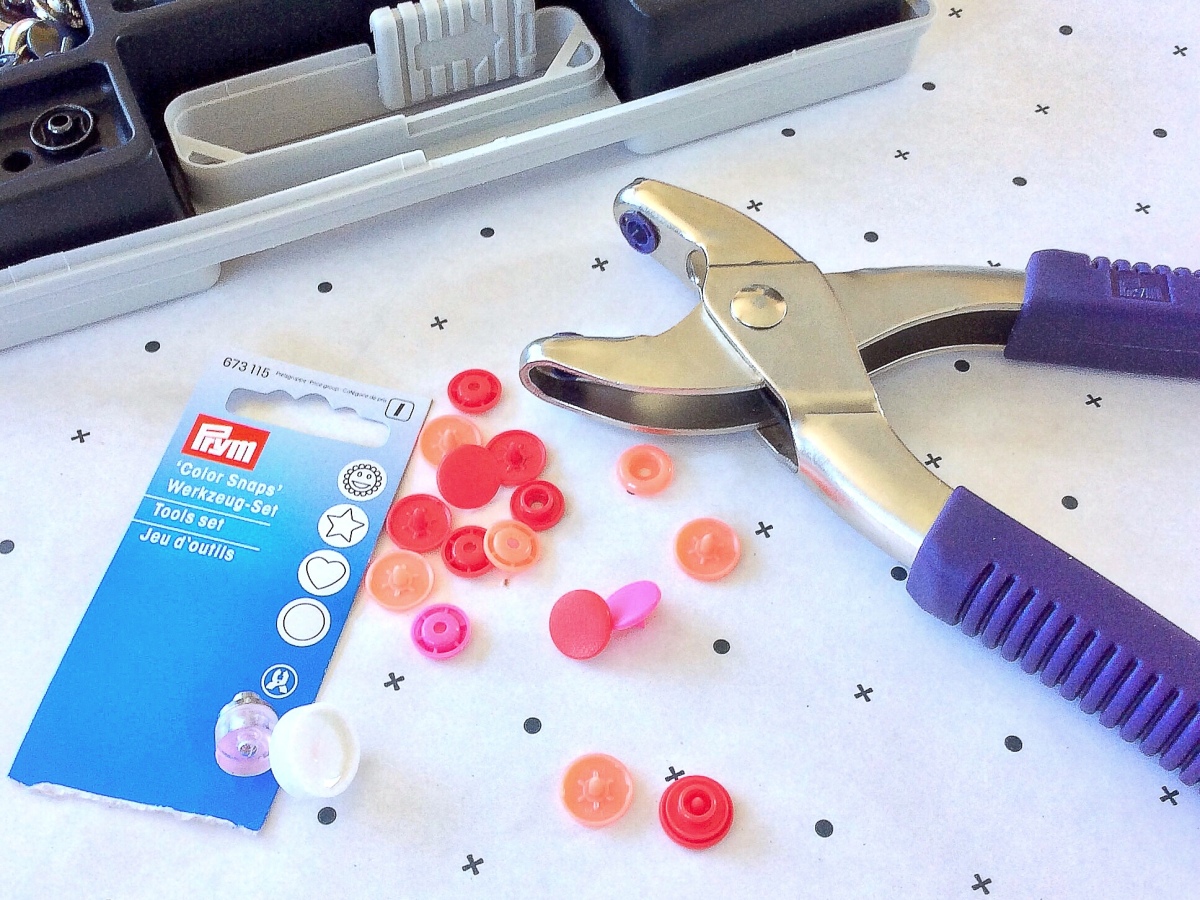
Tutorial : Using Prym Vario Pliers to Insert ‘Love’ Snaps, Jean Rivets and Denim Hardware
Hello sewing friends! I recently made my young daughter a shirtdress using New Look 6884 in a ‘Cherry Crimson’ Art Gallery Fabrics…
Keep reading

Hi Karen, thank you for your lovely comment – I’d love to hear how you got on! Sarah x
LikeLike
Sarah,
Thank you for his very informative and detailed post. I have never done a FBA and realize I have gotten away without doing one for so many years! I have a petite frame but have a C cup. Perhaps that combination is the reason??!! I recently started a pre-cut kit from Alabama Chanin for their T shirt top. I basted it together to check the fit and realized that I would be researching Full Bust Adjustments! Your post along with the one Jennifer Lauren Handmade wrote saved the day! It has literally taken me two days to figure this out but after reading your post everything became crystal clear and just clicked ! Thank you , thank you, thank you!!! I am off to make my muslin of my first FBA!
Love all that you do!
Karen
LikeLiked by 2 people
The original pivot and slide method is by Nancy Zieman. I assure you that even if younger careless sewers have decided to skip that part, it most definitely includes adding length. You add as much length as width from center front to bust apex, and taper nicely back to the original at side seam. Not rocket science, but an essential step
LikeLike
If it is minimum stretch/recovery knit it requires looser fit and I need a dart so front has enough length over bust but matches back length at bust level. It doesn’t work just adding length at the bottom because that is not where I need the extra fabric. A fabric with 2-way stretch, fitted with negative ease reduces the size of the FBA I need. While strain on side seam can be used to fit fabric over width of bust, there is nothing equivalent providing enough strain to stretch over length of bust. I can ease some of the extra length at the bust into the front side seam by stretching the back to match. When it shrinks back you get slight gathers at side front but it looks better than the side and back sagging you get otherwise. Now I look for pattern that have seams that darts can be folded into or added as design feature. With 1-way stretch I’ve found dart sits better if I add it by rotating side dart to sit vertically under the bust as the fabric is stable in that direction.
LikeLike
Thank you fir your feedback, that’s always so helpful! You’re absolutely right, you’ve always got to take the amount of stretch and drape in your fabric into consideration as each one can be so different. When you say you have excess on front side seam, what do you mean exactly? That you have too much excess fabric under the bust at the side? Do you redraw your waist curve? If you could let me know what works for you I’ll gladly incorporate it into the post, that would be really appreciated Karey! X
LikeLike
Last year I finally got around to trying this technique, but with an F/G cup, and 3″ longer over bust than side seam, it just didn’t work for me. It left huge side drag lines and way too baggy over bust. What works depends on fabric stretch and recovery. But even with stretchiest fabric I have to do something about excess on front side seam.
LikeLiked by 1 person
Hi – hope it worked out for you – the key to this method is redrawing the waist curve. xxx
LikeLike
Hi Sarah I was doing some googling on FBA as I’m a 10/12 but a D cup, I mostly sew with knitted fabric but do get extra fabric showing at the backs of my arms, it didn’t occur to me to do an FBA in jersey, I particularly have trouble with the Frankie baseball top, as I have been sewing a 6 for the bust then grading down, but then find this xtra fabric at the back arm and also have to take the sleeves in quite a bit. I will try your method, thanks
LikeLiked by 1 person
Hi Ruth, they match as the dart value is rotated out…the crucial thing is to contemplate the increased width created at the waist…you may need to taper the lines back to their original width. Hope this helps! Xx
LikeLike
Hi Sarah, I just wondered if you needed to add any length to the side seam of the back piece or did they still match after this alteration.
Many thanks,
Ruth leckenby
LikeLike
Very encouraging to see someone with a similar figure to me (D cup and not plus size) blogging about this! Look forward to reading more. Hope I can achieve a decent fit too.
LikeLike
Thank you, Sarah, I’m sure this will come in useful very soon. I like the new look on the blog too.
LikeLike
Finally read this properly and love it! You know I’m more SBA than FBA (sob!) but I found this really interesting from a construction point of view (yeah cause I also lie awake at night thinking about garment construction!) I was wondering whether once you get a perfect shape you could use that part of the pattern piece as a “block” for similar styles so that you wouldn’t have to do it for each new pattern every time… it would have its own drawbacks/ pitfalls, all of which crowd into the pedantic part of my mind as soon as I type this, but it might be worth trying!
LikeLike
Thank you so much for this post, it’s something I’ll definitely find useful. You have a great way of explaining things Sarah! X
LikeLike
Cheers Wendy, I hadn’t thought about how you could apply the same method to a woven for just drawing a curve over the dart end and then adding the extra length to the back piece too. I have the Ogden but have been out of sewing it for this reason, so having read your post I’m much more keen to give it a go!
LikeLiked by 1 person
I somewhat perversely left it on for some time. Thankfully nobody knocked on the door! Ah cheers honey. It just seems once you start thinking about an alteration in detail you realise how altering one thing potentially has a knock on effect in other areas.,.its so easy to quickly end up disappearing down on big hole! 🤣😘
LikeLike
Thank you Janet, hope it works for you! X
LikeLiked by 1 person
Thank you Kay, I hope it helps for you. It is definitely worth thinking about how the FBA will affect the waist measurement of your pattern too, either curve it back in or factor in easing into a waistband or something. Remember any length created may also need replicating on any button band etc. Good luck! X
LikeLike
Thank you Kathleen! Argh things can be so complicated sometimes can’t they! I honestly think putting a dart in is fine – at least if your dart ends up being too high unpicking it and repositioning it shouldn’t leave any tell tale signs on your fabric. I’m quickly hitting the stage of feeling like the amount of time spent altering a pattern to fit makes me want to sew it repeatedly rather than rush to the next thing as I feel I spent too much time altering and not enough time sewing! Good luck with your Toaster! Xxx
LikeLike
Your favoured method is also the method I used on my Ogden Cami dartlesss FBA tutorial. Works like a dream! Xx
LikeLiked by 1 person
This is a fabulous and mega informative post. So good of you to share all your research and your cardigan looks gorgeous. I just hope you remembered to take all those bits of masking tape off before you left the house! 😉 xxxxxx
LikeLiked by 1 person
This is great, thanks Sarah. I tried the cheaty method with my Astoria earlier this year and it didn’t turn out well, so I’m going to give this a go next time I make one. Thanks for going through it in so much detail.
LikeLiked by 1 person
My method works ok but can make boob drag lines, it’s always a gamble where this makes so much more sense, also I never add length but seeing this is a lightbulb as I do doing a woven fba. I have to learnt to sew and make alterations by lovely ladies like you sharing your knowledge and tips, thank you so much x
LikeLiked by 1 person
Very very helpful and thoughtful post Sarah, thanks so much. I will definitely try this and I know I need the extra length at the front as well as full bust adjustment without affecting chest area and shoulders. Your finished Jenna looks lovely.
LikeLiked by 1 person
I can totally see how that could work too though! Clever! Does it depend on the stretch of your fabric as to how effective it is or sometimes isn’t? Intrigued! Xx
LikeLike
This is so clever and something I’m definitely going to try out as my usual chuck a curve in the sideseam and hope for the best is very hit and miss 😬
LikeLiked by 1 person
Hi Tina, thank you for your comment.Certainly I haven’t found a magic wand and I do think there are limitations to how much can be achieved with removing darts completely. However, the bottom hem is not wonky at all once worn…the curve of the hem allows for the shape of the chest, it is straight on. 😉 as with any alteration, a certain amount of finessing will be required to achieve the fit you particularly want. I do address the side seams, suggesting redrawing the curve back in. I didn’t show it on my pattern since it’s essentially a crop top and was somewhat moot. I’d love to hear your suggestions, we’re all learning here x
LikeLike
I agree, I think they’re are limitations and certainly heavier weight Knits would be able to take darts without any problems at all wouldn’t they. Xx
LikeLiked by 1 person
Thanks Sarah
One of my pattern drafting books suggesting something like that (reducing the added with by half at the waist). I’d wondered how you managed to have a trim look at the waist 🙂
Again, I suspect that it may depend on both the amount of negative ease on the pattern and stretch of the fabric.
I started to think about options a few years ago visiting Oxford when I discovered Pepperberry (now Bravissimo – clothes for big busts). They have darts in most of their stretch clothes, suggesting there are limitations on removing darts in many designs.
LikeLiked by 1 person
Hello, this method is obviously a good starting point, but it still leaves the bottom hem pretty wonky and in no way trued in the side seam. And problem no 2 (as mentioned) you now have all that extra fabric over the belly now. This makes it look a little “halfbaked” as a method to me. Why don’t you add instructions on how to solve those two problems too, as at least the sideseam now will be a major headache?
LikeLiked by 1 person
I really appreciate your comment Karen and I’ve now edited the post to deal with this issue. Thank you so much! Xx
LikeLike
Hi Karen, it’s a good point. This pattern has a hem band so I simply eased the excess into that, which worked a treat. I think in a situation where you didn’t have a hem band you would have to taper your waist in perhaps. Xx
LikeLike
I just discovered this elegant technique too. However what stands out to me in your original vs fba bodice photo is all the excess width now added to the bodice at the waist. Based on my experience with other patterns, I’m concerned that depending on the amount of negative ease in the pattern it would make garment too loose and hang like a sack.
LikeLiked by 1 person
Sarah this is brilliant! I wish I’d seen this the other day :)) I’m just finishing a Toaster Sweater (View B). When I did my first practice run I thought I might get away with just cutting it a size larger at the bust and grading down to the waist. That didn’t work at all. It was HUGE across my chest and the underarm was wonky too. So I knew I would have to do an FBA (we always imagine we’re going to get away with not doing it don’t we???) I did use Alexandra’s method and ended up with a bust dart (I can hardly ever get away without a bust dart – I’m an FF cup with narrow shoulders and I’m tall – 5’8″) but as I’m finishing this beautiful sweater in a gorgeous (and rather spendy) french terry I’m panicking thinking that dart might end up sitting too high. You’re absolutely right that finding your bust point on a knit can be difficult especially working with a rather complicated neck style the Toaster has (an extension basically of the bodice). I am bookmarking this tutorial for future reference for sure though. I’m thinking about making View A which is a different bodice style (raglan sleeves) and I can try this method with it to compare 🙂
LikeLiked by 1 person