
I am so happy to be writing this post as it’s been such a long time coming! I first starting banging on about sewing my own bras back in my 2017MakeNine list (which is a perfect example of why I’ve stopped making these lists!) Why has it taken me so long? A couple of reasons, confusion being one – fear definitely being the second.

If this is you, let me attempt to talk you out of that, hopefully convincing you that there really is nothing to fear – whilst I try to simplify any confusion you may have with regard to the seeming myriad of different elastics and supplies you might think you need. But first…
Why Sew Your Own Bras?
Why did I so desperately want to sew my own bras? It wasn’t about design choice for me, or even about accomplishing new sewing skills – which, of course, are both extremely valid reasons! It was because wearing bras tended to make me, what I term, ‘Brangry’ (Bra = Angry)! I would wrestle my way out of any bra I was wearing the nano-second I walked through the front door. I wouldn’t even stop in my tracks to do it; I’d end up tossing said bra over whatever I was passing as I furiously whipped it off. Family and visiting friends were accustomed to finding bras discarded in a Brangry fit over the back of dining chairs, in the fruit bowl (it was otherwise empty!), down the back of the sofa – even in the shoe rack! No matter what size bra, no matter what style, no matter whether I’d had it professionally fitted or not – I hated wearing bras – they were uncomfortable to the point they’d make me seriously agitated.
I’d long suspected its partly down to my shape – I’m a DD cup on a relatively narrow petite frame. Bra straps would constantly fall off my shoulders (tightening them didn’t help). My boobs are also quite bottom heavy – 90% of shop-bought bras would squish and flatten my boobs in the lower cup so they’d end up overspilling in the top cup – even if it was ‘technically’ the right size. If I sized up, they’d fit in the bottom cup and then gape in the top. I could go on and on…suffice to say my loathing of bras goes a long way to explaining why I tended to live in PJs when at home!

Are you noticing the past tense I’ve been using? Oh yes, things have very definitely changed – I’ve gone from stark raving Brangry to being very Brappy. (I’ll let you work that one out 😉 ) So, here’s why…

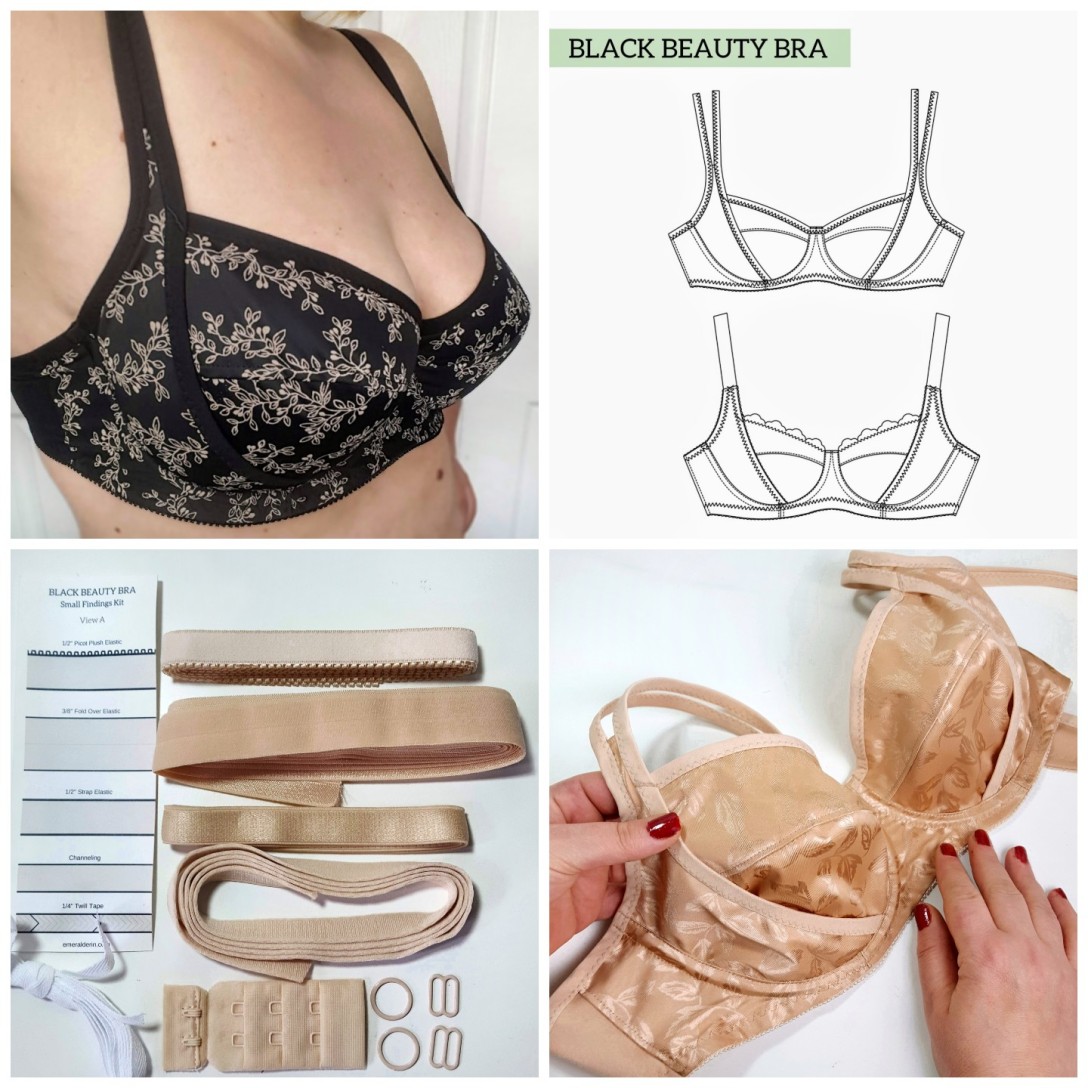
Within five minutes of seeing the release of the Black Beauty Bra (by Emerald Erin) pop up in my Instagram feed, I’d bought the pattern. 30 minutes later and it was printed out and I was reading through the instructions. I clicked over to her Store and decided to buy a few sets of Findings packs to save myself the hassle of trying to separately source them all. I browsed the web and bought a couple of different lengths of duoplex – a Jacquard ‘nude’ and a black (both from Sewing Chest). If you’re planning on sewing View A, Duoplex is ideal; it’s a polyester, non-stretch knit fabric which is sturdy enough for both the cups and the bridge of the bra. You will also need some Powernet fabric – this is the highly stretchy yet strong and supportive stuff that forms the back band of the bra (look for the crucial word ‘strong’ in the description when browsing options). Alternatively, if you’re in Canada (or you don’t mind paying the additional fees from shipping from abroad) you can buy entire kits direct for the whole bra, including the underwires, whether you want to make View A (the sturdier day-wear version I wanted) or View B (all the pretty lace and tulle!) If you really want to source your bits in the UK it is most definitely worth checking out www.sewingchest.co.uk who are now stocking kits that work with this bra! (and if you can’t see something you need on their site, do email them!) ((I’ve subsequently made the lined lace View B of this Bra – see blog post HERE using this lace kit from them.))

But guess what, after all that initial frenzy; all those supplies sat in my stash drawer for, oooh, at least another five months. Y’see, I was still dealing with the fear.
I had hella incentive to make my own bras, so to procrastinate for so long must have meant that my fear was huuuuuge. As always, in hindsight, I can’t really remember what that fear was. Was I expecting it to be really fiddly – all those weeny seams? I suspect it was mainly a fear of disappointment – what if it didn’t work out and I was left with the shattering reality of being consigned to a lifetime of feeling Brangry?!
My advice is, whatever shape your fear takes; acknowledge it, feel it and sew the damn bra anyway!

It’s really not as fiddly as you might think. Yes those seams are small but as long as you are working with the right needle, they shouldn’t pose too much of a problem. I used a stretch 70 needle on my first (the nude one) and it was all plain sailing. Strangely, when it came to sewing the second, I had an absolute nightmare initially trying to sew and topstitch the outer cradles to the bridge. I switched out my jersey needle for a fresh one. Didn’t help. I changed it for a Sharp. Didn’t help. I changed it for a Schmetz Univeral and Bingo – we were back to all systems a go-go. I don’t know what laws were at play here but if you’re suffering with skipped stitches and fabric being chewed into your feed dogs, play around with needles and foot pressure tension on a scrap of fabric. You’ll get there.
The instructions for the Black Beauty Bra – from what size to cut through to construction – are clear and easy to follow. In fact in turns out that, far from being a difficult, highly technical thing to sew, it’s a ‘Bish, Bash, Bosh you’ve sewn yourself a Bra!’ type project. And it’s fun!
My Verdict on my Finished Bras!?
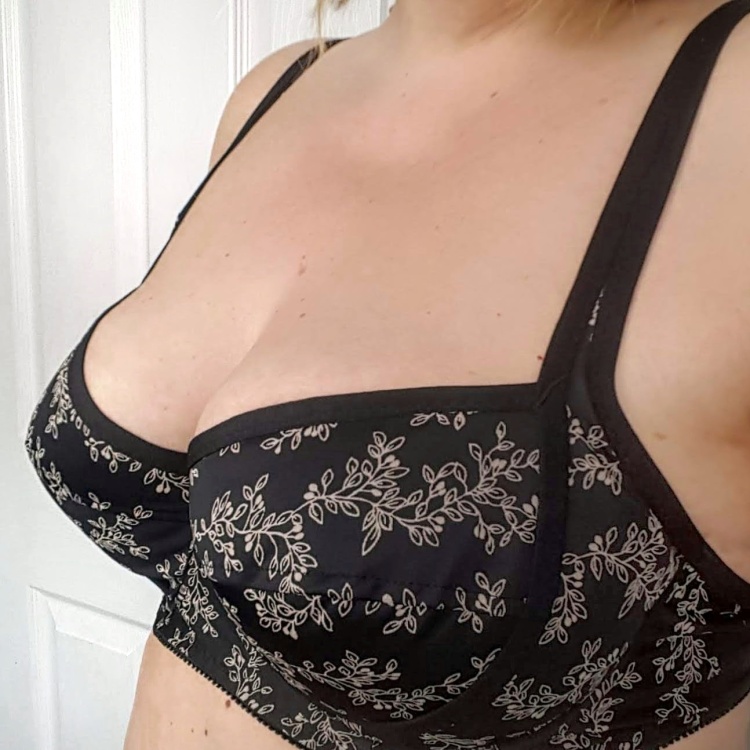
I sewed both my bras straight out of the envelope; only placing the back strap just a wee bit further towards the centre of my back (to help with my narrow frame). I figured I’d worry about fitting alterations later.
But guess what?! They’re both turned out perfectly. Utterly utterly perfect. Can you tell I’m still in shock?! I say perfect, they’re almost perfect – I’m going to use a wider, 3 part, Hook & Eye fixing next time (widening the back band to fit).
It’s love, pure and simple. The Black Beauty Bra rocks! It’s comfortable – and that’s me of all people saying that! My boobs feel supported; I can almost forget I’m wearing a bra! I’ve even jogged in mine (not intentionally, haha, I was just in a rush) AND NO BOUNCING! They look perky; my clothing hangs better. And they feel such a well-constructed expensive bit of lingerie – my old RTW ones look shabby in comparison.
Actually, its been illuminating making my own in more ways than one (or two 😉 ) – it’s given me the ‘eyes’ with which to see just why all the RTW ones were so terrible…one had the back straps attached just to the very top edge of the back band, so yeah it was going to pull and ride up my back. One was too narrow in the depth at the sides so yeah it was going to cut in. One had virtually no real cradle support at the centre of the bra, just some lace…and more than one had underwires that were almost circular which meant they cut into the outer top edge of my breasts (to the point of routinely breaking blood vessels in my skin) – I do not have circular orbs that sprout from the centre of my chest; I have boobs that have fed two children that start from my armpit! The list of design ‘faults’ in my RTW bras is long and I was very happy consigning them to the bin; where they rightfully belong.
My Tips & Recommendations for Sewing your own Bra
- For your first bra, I heartily recommend buying at least the fixings kits to start with (if you’re in and around Canada, the ones from Emerald Erin contain generous amounts of everything you need and come with a handy little chart to help familiarise yourself with the contents). If you’re in the UK and think you’re going to ‘blind yourself with science’ researching all the separate bits – and chances are you will just give yourself a headache and quit if you do (been there and done that so many times!) especially if you’re in the UK where buying options seem limited, note that www.sewingchest.co.uk are now stocking entire kits that work (see my version of View B using one of their kits HERE)
- Unless you really, really want all the pretty lace and tulle, opt for View A initially – there are less steps and it will give you the confidence to Approach B. (You can see my version of View B HERE)
- If you haven’t got them in your kit, get yourself some WonderClips and some WonderTape. I really didn’t want to use pins unless absolutely necessary with this project, WonderClips were easier and more practical. WonderTape is great for holding the small side seams open before topstitching in place – I didn’t find it necessary elsewhere.
- Whilst sewing the bra, if you’re struggling with chewed fabric and / or skipped stitches, don’t think its you. It’s likely only a change of needle type is required.
So there you go! I kind of just want to sew all the bras now and nothing else! I have No. 3 cut out but have forced myself to put it to one side. I see sewing my own bras as becoming a staple part of my sewing practice – I’ll probably routinely sneak them in between other projects. I know they’re fun, I know they’re not difficult and I know they’re reasonably quick to sew so they’re perfect ‘palate cleansers’.
Are you going to have a go?! As for the term ‘Brangry‘, surely I can’t be the only woman whose RTW bras made her feel that way?! If you would like to see my version of View B – with lining and lace / tulle, you can read that HERE.
Until next time, happy sewing (and happy boobs!)
Disclaimer : NOT a sponsored post or Affiliated to Emerald Erin in any way – All items mentioned were purchased by me. Opinions given are my honest and unbiased opinion. Post contains unrelated Affiliate links; if you chose to purchase via these links you will not be charged any extra, however, I may receive a small commission.

[…] my interest again. Sewing Chest had a black beauty kit as a tester for fit. I’d seen Sew Sarah Smith make it up and thought it was a great idea as a trial. It had everything you’d need except […]
LikeLike
Completely awesome! I’ve just stumbled across this post in my quest for alterations of the Black beauty bra – I made my first one yesterday out of scraps from a kit I had bought from Bra Maker Supply, or what was the Australian go to shop for said kits and things. I love this! I love how you have recognised that ready to wear bras are terrible to wear because they don’t fit!!! And I love that you embraced what seems to be a growing trend of making your own bras. I was surprised at how fast this was to put together. I think I took longer sewing a Pin up girls classic bra. I lengthened the band on mine as I usually measure a 42 and now I’m tossing up over to shortened it again and/ or take a dart out of the upper cup because it’s all saggy glory up there! They do hold you up and forward though and for us ladies with bigger busts, we need that for sure! I like Duoplex for bra making. Other fabrics like Tricot just seem so flimsy. I want to cover my next one with lace so we shall see.
LikeLike
Hi Lucy…no I don’t think it would work without the wire…hopefully if the fit is correct you’d find it comfortable even with the wires…that said, I am also on the lookout for a good supportive wireless bra too because there are still days when I’m hormonal when wires will drive me crazy too!!
LikeLike
Hi there! I’m so tempted to give this bra a go since bras also make me brangry! I usually find underwires quite uncomfortable – would this pattern work if I left the underwires out?
LikeLiked by 1 person
[…] made using duoplex fabric and intended as ‘everyday’ wear bras. (You can see that post HERE). It was no exaggeration to say the experience revolutionised the way I feel about sewing my own […]
LikeLike
[…] yes, you guessed it, in my last blog post I showed you two versions of a bra I’ve sewn recently; yes, I cut them both out using this […]
LikeLike
Hi love; sorry your comment went into my spam folder initially! Oh what a pain; I totally understand how frustrating it is looking for supplies and then just getting confuddled by the whole thing – it played a large part in my procrastinating for three years! BUT I have since heard from http://www.sewingchest.com that they are putting specific kits together for both View A and B which will specifically work for this bra pattern to help out us UK sewers!! Or if you just want something specific I’d email them direct as they have stuff that might not yet be up on their site.
It’s a pain in the whatsit when you put time, effort and costly materials into a project, only to have it not work out isn’t it; the only pre-fitting I did with this was to place the cup pattern pieces (which have the seam allowances marked) against a RTW bra – to make sure the shape and size was better. I do think this is a good bra pattern to start with. It might be worth giving it a go with one of the kits? Or else a course will probably pay for itself eventually when we have to pay such eye-watering prices for a good RTW one. I do feel it’s worth another push Janice love ‘cos its one of the most empowering sewing projects I’ve ever undertook! xxx
LikeLike
Thank you Manju – that was always the way I felt when I looked at other people sewing beautiful bras but I realise now, in the doing, it’s a lot more straightforward than I realised! Do have a go Manju; I’d love to hear what you thought about the whole process too xxx
LikeLike
thank you Angel! I really wish I hadn’t left it off for so long – I think I struck lucky with this pattern for a first go! xx
LikeLike
Hi Sue, thank you so much! Let me know how you get on or if there’s anything I might be able to help you with xxx
LikeLike
Wow so impressed sarah. This is something I have been thinking about forever so I really want to try it. So well done!
LikeLiked by 1 person
Totally understand brangry! This is a brilliant post, so informative and I definitely feel inspired to give bra making a go. Thank you . xxxx
LikeLike
I’ve been making bras for about five years and still don’t think I’ve found “the one”, so I’m off to buy this pattern. Thank you for the excellent review. Oh, and I totally get brangry!
LikeLiked by 1 person
thank you Nucole. I wonder if it’s just a case of finding a wire that’s a better shape and size for you?? but I’m all fur non-wires too!! xxx
LikeLike
I’ve got a little box full of findings and elastic and all the bits but I’ve got too much fear. You’ve given me a push. Now all I need is to find a non-wired pattern. I’m scared of wires because that’s the thing I find most uncomfortable. Maybe I should make one of these and see. Great post, as always. Thanks Sarah.
LikeLiked by 1 person
Thanks Bren!! Time to banish the Branger for good eh! Here’s to your success! x
LikeLike
thank you Helen! yes that’s exactly the point is reached when I finally decided to just get on with it! I’m all fur research but in this case I found myself doing it more for procrastination purposes than anything else! and no research was more illuminating than just actually sitting down and getting on with it!! I hope you really enjoy making yoyrs and end up with bras you love!!! x
LikeLike
Your bra looks great and it’s such a good fit. I intend to have a go, as I am so fed up with RTW bras. I’m definitely brangry, too!
LikeLiked by 1 person
Thank you for such a detailed post, which couldn’t have come at a better time for me as I’m researching making my own bras because none of the commercial ones I’ve tried fit. Yours have turned out beautifully and it’s made me realise I need to just stop researching and get on with it!
LikeLiked by 1 person
Hi!! good point! there is a bit of separation between the two underwire channels at top centre front. The pattern instructions suggest that an E cup or above would mean that the two underwire channels would meet and overlap at that point. hope that helps x
LikeLike
Interesting – I’m a similar shape – 32E/F in bra sizes, but find being braless so uncomfortable I do wear the damn things. I’ve tried the Pin Up Girls Shelley – and my recommendation on that is don’t – and have the Malborough on my MakeNine (along with knickers, so I can cop out and complete) and bra kits to use. What I can’t see in your pictures is how narrow that gore is. My daughter, who is a 28/30 GG is wearing her third attempt at a Malborough and planning to make more, when she has worked out the right underwire size. Finding the right underwire is a whole ‘nuther ball game.
LikeLiked by 1 person
The hand holding is just what I needed. I have made one bra already, the Marlborough, and it fit the dog better than it fit me. The sewing wasn’t a problem, just the fit. I suspect that despite careful measuring, I made the wrong size, but after two attempts I became disheartened. I found it very frustrating that I couldn’t get anyV idea of the fit until it was virtually completed and even then I couldn’t make any adjustments on my own. (My DH is not allowed near my body with pins in his hand – toobpotentially dangerous). I also took your earlier advice and looked at the two sites you mentioned for supplies but still managed to come away confused and with the money still tightly secured in my wallet. Now you have declared the specifics I will brave it again. I had been tempted to pay £££ for a bra making weekend but that just makes the whole shebang mucho costly. I can buy rtw to fit but have to spend +£60 for the pleasure, donut makes the cost of the fabrics and findings an attractive proposition. Who new that I needed so much hand holding. Thank you.
LikeLiked by 1 person